Showing posts with label samsung. Show all posts
Showing posts with label samsung. Show all posts
Friday, September 29, 2017
SAMSUNG FRP RESET DONE WITH ODIN DOWNLOAD MODE
SAMSUNG FRP RESET DONE WITH ODIN DOWNLOAD MODE
SAMSUNG FRP RESET DONE WITH ODIN DOWNLOAD MODE
SAMSUNG FRP RESET DONE WITH ODIN DOWNLOAD MODE
SUPPORTED MORE THAN 100 SET
NOTE :OWN RISK
HOW TO USED
1) Connect phone in download mode using vol down + home + power.
2) Samsung Drive Install
3) Connect phone to pc and open odin Link : Download
4) Select Your File in Ap in odin and start.
Supported Model:
Exynose
SM-A310F ,SM-A310FD ,SM-A310M ,SM-A310MD ,SM-A310N0 ,SM-A310Y ,SM-A510F ,SM-A510FD ,SM-A510K ,SM-A510L,SM-A510M ,SM-A510MD ,SM-A510S ,SM-A510Y ,SM-A510Y ,SM-A710F ,SM-A710FD ,SM-A710K ,SM-A710L ,SM-A710M ,SM-A710MD ,SM-A710S ,SM-A710Y ,SM-A800F ,SM-A800I ,SM-A800IZ ,SM-A800S ,SM-A800YZ ,SM-G150NO ,SM-G150NK ,SM-G150NL ,SM-G150NS ,SM-G155S ,SM-G389F ,SM-G5500 ,SM-G550F ,SM-G550FY ,SM-G550T ,SM-G550T1 ,SM-G550T2 ,SM-G570F ,SM-G570M ,SM-G570Y ,SM-G610F ,SM-G610FD ,SM-G610FZ ,SM-G610K ,SM-G610L ,SM-G610M ,SM-G610S ,SM-G610Y ,SM-G800F ,SM-G800I ,SM-G800M ,SM-G800Y ,SM-G850F ,SM-G850FQ ,SM-G850K ,SM-G850L ,SM-G850M ,SM-G850S ,SM-G850Y ,SM-G903F ,SM-G903FD ,SM-G903M ,SM-G903W ,SM-G920A ,SM-G920AZ ,SM-G920D ,SM-G920F ,SM-G920FD ,SM-G920FZ ,SM-G920I ,SM-G920K ,SM-G920L ,SM-G920S ,SM-G920T ,SM-G920T1 ,SM-G920W8 ,SM-G9250 ,SM-G9250A ,SM-G9250F ,SM-G9250FQ ,SM-G925I ,SM-G925K ,SM-G925L ,SM-G925S ,SM-G925T ,SM-G925T1 ,SM-G925W8 ,SM-G9287 ,SM-G9287C ,SM-G928C ,SM-G928F ,SM-G928G ,SM-G928I ,SM-G928K ,SM-G928L ,SM-G928NO ,SM-G928N0 ,SM-G928S ,SM-G928T ,SM-G928W8 ,SM-G930F ,SM-G930FD ,SM-G930K ,SM-G930L ,SM-G930S ,SM-G930W8 ,SM-G935F ,SM-G935FD ,SM-G935K ,SM-G935L ,SM-G935S ,SM-G935W8 ,SM-J120A ,SM-J120AZ ,SM-J120F ,SM-J120FN ,SM-J120G ,SM-J120M ,SM-J120P ,SM-J120W ,SM-J120ZN ,SM-J200BT ,SM-J200F ,SM-J200G ,SM-J200GU ,SM-J200M ,SM-J200Y ,SM-J320A ,SM-J320AZ ,SM-J320W8 ,SM-J321AZ ,SM-J700F ,SM-J700H ,SM-J700M ,SM-J700T ,SM-J700T1 ,SM-J710F ,SM-J710FD ,SM-J710FN ,SM-J710FZ ,SM-J710GN ,SM-J710K ,SM-J710MN ,SM-N910C ,SM-N910H ,SM-N910K ,SM-N910L ,SM-N910S ,SM-N910U ,SM-N9916K ,SM-N916L ,SM-N916S ,SM-N920C ,SM-N920CD ,SM-N920F ,SM-N920G ,SM-N920I ,SM-N920K ,SM-N920L ,SM-N920S ,SM-N920T ,SM-N920W8 ,SM-N930F ,SM-N930FD ,SM-N930K ,SM-N930L ,SM-N930S
Qualcomm
SM-G3815 ,SM-G3818 ,SM-G3819 ,SM-G386T ,SM-G386T1 ,SM-G386W ,SM-G388F ,SM-G5108 ,SM-G5108Q ,SM-G5109 ,SM-G5308W ,SM-G5309W ,SM-G530A ,SM-G530BT,SM-G530F ,SM-G530FQ ,SM-G530FZ ,SM-G530H ,SM-G530M ,SM-G530P ,SM-G530Y ,SM-G531F,SM-G531Y ,SM-G5700 ,SM-G6000 ,SM-G600F ,SM-G600FY ,SM-G600S ,SM-G6100 ,SM-G710 ,SM-G7102 ,SM-G7102T ,SM-G7105 ,SM-G7105L ,SM-G710K ,SM-G710L ,SM-G710S ,SM-G7200 ,SM-G7202 ,SM-G720AX ,SM-G720NO ,SM-G730A ,SM-G730M ,SM-G730W8 ,SM-G7508Q ,SM-G7509 ,SM-G750A ,SM-G750F ,SM-G750H ,SM-G800H ,SM-G800HQ ,SM-G850A ,SM-G850T ,SM-G850W ,SM-G860P ,SM-G870A ,SM-G870D ,SM-G870F ,SM-G870FO ,SM-G870W ,SM-G890A ,SM-G891A ,SM-G9006V ,SM-G9006W ,SM-G9008V ,SM-G9008W ,SM-G9009D ,SM-G9009W ,SM-G900A ,SM-G900F ,SM-G900FD ,SM-G900FG ,SM-G900H ,SM-G900I ,SM-G900K ,SM-G900L ,SM-G900M ,SM-G900MD ,SM-G900P ,SM-G900S ,SM-G900T ,SM-G900T1 ,SM-G900T2 ,SM-G900T3 ,SM-G900V ,SM-G900W8 ,SM-G901F ,SM-G906K ,SM-G906L ,SM-G906S ,SM-G9105 ,SM-G910S ,SM-G9200 ,SM-G9208 ,SM-G9209 ,SM-G920P ,SM-G920R4 ,SM-G925P ,SM-G928P ,SM-G9300 ,SM-G9308 ,SM-G930P ,SM-G930T ,SM-G930T1 ,SM-G930U ,SM-G930V ,SM-G935P ,SM-G935T ,SM-G935T1 ,SM-G935U ,SM-G935V ,SM-J100F ,SM-J100FN ,SM-J100G ,SM-J100M ,SM-J100MU ,SM-J100MV ,SM-J100VPP ,SM-J100Y ,SM-J105M ,SM-J110F ,SM-J110G ,SM-J110M ,SM-J3110 ,SM-J3119 ,SM-J320P ,SM-J320YZ ,SM-J500F ,SM-J500FN ,SM-J500G ,SM-J500H ,SM-J500M ,SM-J500NO,SM-J500Y ,SM-J5108 ,SM-J510F ,SM-J510FN ,SM-J510G,SM-J510H ,SM-J510K ,SM-J510L ,SM-J510MN ,SM-J510N ,SM-J510S ,SM,J510UN ,SM-J7108 ,SM-N750 ,SM-N7500Q ,SM-N7502 ,SM-N7505 ,SM-N7505L ,SM-N900 ,SM-N9000Q ,SM-N9002 ,SM-N9005 ,SM-N900A ,SM-N900K ,SM-N900L,SM-N900P ,SM-N900S ,SM-N900T ,SM-N900V ,SM-N900W8 ,SM-N910A ,SM-N910F ,SM-N910G ,SM-N910P ,SM-N910T ,SM-N910V ,SM-N910W8 ,SM-N9150 ,SM-N915A ,SM-N915D ,SM-N915F ,SM-N915FY ,SM-N915G ,SM-N915S ,SM-N915T ,SM-N915W8 ,SM-N9200 ,SM-N9208 ,SM-N920P ,SM-N9300,SM-N930A ,SM-N930P ,SM-N930R4 ,SM-N930T ,SM-N930U ,SM-N930W8 ,SM-P350 ,SM-P350 ,SM-P355 ,SM-P355C ,SM-P355M ,SM-P355Y ,SM-P550 ,SM-P555 ,SM-P555C ,SM-P555K ,SM-P555L,SM-P555M ,SM-P555S ,SM-P555Y ,SC-01C ,SC-01D ,SC-01E ,SC-01F ,SC-01G ,SC-02B ,SC-02C ,SC-02E ,SC-02F ,SC-03D ,SC-03E ,SC-04 ,SC-04E ,SC-04F ,SC-04G ,SC-05D ,SC-05G ,SC-06D SCH-I435 SCH-I545 SCH-I959 SCH-M490SCH-M710 SCH-M715 SCH-M719 SCH-R960 SCH-W200SCH-W210 SCH-W240 SCH-W270 SCH-W290 SCH-W300 SCH-W330 SCH-W350 SCH-W360 SCH-W80 SCH-W390 SCH-W390M SCH-W410 SCH-W420 SCH-W450 SCH-W460 SCH-W460R SCH-W510 SCH-W550SCH-W560 SCH-W570 SCH-W580 SCH-W590 SCH-W690 SCH-W720 SCH-W740 SCH-W750 SCH-W760 SCH-W770 SCH-W780 SCH-W830 SCH-W850 W850I SCH-W860 SCH-W880SCH-W890 SCH-W900 SCH-W910 SCH-W920 SCH-W930 SCH-W940 SCL24 SGH-A767SGH-A777 SGH-A847 SGH-A847D SGH-A847M SGH-A847R SGH-A877 SGH-A887SGH-A927 SGH-I187 SGH-I257 SGH-I257M SGH-I317 SGH-I317M SGH-I337SGH-I337M SGH-I337Z SGH-I407 SGH-I437 SGH-I437P SGH-I437Z SGH-I497 SGH-I527SGH-I527M SGH-I537 SGH-I547 SGH-I547C SGH-I577 SGH-I677 SGH-I677LSGH-I677T SGH-I717 SGH-I717D SGH-I717M SGH-I717R SGH-I727 SGH-I727RSGH-I747 SGH-I747D SGH-I747M SGH-I757M SGH-I777 SGH-I827 SGH-I827DSGH-I847 SGH-I8700 SGH-I897 SGH-I917 SGH-I917R SGH-I937 SGH-I957
SGH-I957D SGH-I957M SGH-I957R SGH-I997 SGH-I997R SGH-M819N SGH-M919 SGH-M919M SGH-M919V SGH-S730M SGH-T199 SGH-T359 SGH-T399 SGH-T399N SGH-T469
SGH-T469V SGH-T469W SGH-T479 SGH-T479B SGH-T499 SGH-T499V SGH-T499Y SGH-T589 SGH-T589R SGH-T589W SGH-T599 SGH-T599N SGH-T599V SGH-T669 SGH-T679
SGH-T679M SGH-T699 SGH-T759 SGH-T769 SGH-T779 SGH-T839 SGH-T879 SGH-T889 SGH-T889v SGH-T899m SGH-T939 SGH-T959 SGH-T959p SGH-T959v SGH-T989 SGH-T989d SGH-T999 SGH-T999l SGH-T999n SGH-T999v SHV-E110S SHV-E120K SHV-E120L SHV-E120S SHV-E140S SHV-E150S SHV-E160K E160L SHV-E160S SHV-E170K
SHV-E170L SHV-E170S SHV-E210K SHV-E250K SHV-E250S SHV-E270K SHV-E270S
SHV-E275S SHV-E300K SHV-E300L SHV-E300S SHV-E330K SHV-E330L SHV-E330S SHV-E470S SHV-E500L SHV-E500S A110K SHW-A110S SHW-A130 SHW-A160S SHW-A180S SHW-A210S SHW-A220S SHW-A250K SHW-A250S SHW-A300S SHW-M100S SHW M110S SHW-M130K SHW-M180S SHW-M190S SHW-M350S SHW-M250K SHW-M250S SHW-M340S SHW-M440S
LinK Here
Download
download file now

Samsung Camera Error Files
Samsung Camera Error Files
If you are Face camera failed problems on your smartphone
try these File And write with odin flash tool

J210F Camera solutiont .tar

Samsung J200G
more coming soon
download file now
Samsung J5 Prime SM G570F DS Frp Remove 100 Working File Solution
Samsung J5 Prime SM G570F DS Frp Remove 100 Working File Solution

After Download unzip combination firmware and u will find this file inside COMBINATION_OJV_FA60_G570FXXU1APJ2_OJV1APJ2_CL9555 172_QB11274596_REV00_user_mid_noship.tar.md5
Now Select This File In Z3X or Miracle Box or Any Samsung Flashing Tool ( uncheck all files except Sboot.bin and Boot.img )
Now Connect Your Phone In Download Mode ( Vol - + Home btn + power btn )
and write flash ( note :- only flash Sboot.bin and Boot.img no need to flash entire firmware )
and after flashing complete your phone will reboot to normal wait for complete boot.
once your phone come in normal mode your phone adb mode should become enable.
now with z3x or any other tool Reset FRP in ADB mode.
Go to setting in phone and make factory reset from menu than flash phone back to original firmware worked like a charm with the version 6.0.1 (G570F)
download file now
Thursday, September 28, 2017
Firmware Samsung Galaxy A7 2016 SM A710F Via Odin
Firmware Samsung Galaxy A7 2016 SM A710F Via Odin


I.G.I 2 Covert Strike Pc Game!
System Requirements!
Windows 7,Xp,Vista
Ram: 128 Mb
Cpu: 450 Mhz
Password=www.fullypcgames.net

igi2
,igi 2 border crossing
,igi 2 mission 1
,igi 2 mission 6
,igi games 1
,igi 2 mission 18
,igi mission 10
,how to complete igi 2 mission 1
download file now
Cara Flashing Samsung Galaxy Luna S120VL Via Odin
Cara Flashing Samsung Galaxy Luna S120VL Via Odin

Cara Flashing Samsung Galaxy Luna S120VL Via Odin Flasher karena kendala seperti Mati total HardBrick, Bootloop Virusan, aplikasi force close, kesalahan download, aplikasi error, touchscreen tidak sensitif, memory internal virusan, loading bootloop berulang-ulang, hingga matot semua bisa di flash update firmware selama masih bisa terdeteksi di driver computer. atau anda juga bisa melakukan Factory Reset Samsung Galaxy Luna S120VL dengan menekan tiga kombinasi tombol pada saat posisi hp mati dan tahan tombol Vol Up+Home+Power sehingga muncul robot android. lalu lakukan wipe user data. wipe cahce dan reboot. terkadang tidak cukup membantu dan butuh di program ulang.
Cara Flashing Samsung Galaxy Luna S120VL Via Odin
- Berikut peralatan flash yang harus di download sebelum melakukan Flash update :

- Usb driver disini atau samsung kies disini
- Odin v3 disini
- Firmware Samsung Galaxy Luna S120VL disini
- gudangflasing
- kalau semua peralatan di atas sudah di siapkan maka, ikuti panduan ini dengan benar :
- Install Usb Driver samsung atau samsung kies di Computer kamu.
- Extrack firmware win rar archive Samsung Galaxy Luna S120VL dengan win rar hingga ada file .md5
- Matikan galaxy kamu. tekan dan tahan tombol Vol bawah+Home+Power hingga muncul download mode
- Pilih lanjutkan dengan menekan volume atas
- Sambungkan Hp ke computer dengan kabel Usb
- Buka odin V.3 dan lihat apakah di kolom ID:COM berwarna biru jika belum berwarna biru ulangi langkahnya dari no 3
- Jika ID:COM sudah berwarna biru berarti sudah siap ke tahap proses Flash
- Klik PDA / AP pada odin dan arahkan file firmware yang di Extrack tadi lalu pilih J200GUXXXopoikiXXX.md5 <---- Nama file extrack
- Tunggu sebentar hingga odin success menyiapkan file firmware
- Klik START di Odin Tunggu sampai proses selesai (PASS) Galaxy inti restart otomatis.selesai
CATATAN!!!!!!!
Jika mengalami kegagalan flashing pastikan anda mendownload file stock rom serta versi flashtool yang benar, Anda dapat menggulang dari awal jika terjadi kegagalan proses flashing update pada samsung. pastikan tidak ada gangguan selama proses flashing seperti kabel tersenggol ada kendala yang membuat flashing terputus di tengah jalan. selamat mencoba
Untuk Tutorial lengkap bisa di lihat disini : Flashing Samsung Mengunakan Odin3
Tag :Samsung
download file now
Jadwal Rilis Samsung Galaxy S8 Diprediksi Bakal Ngaret
Jadwal Rilis Samsung Galaxy S8 Diprediksi Bakal Ngaret
RUMOHPONSEL.COM - Cara Flashing Panasonic Eluga Power Via Flashtool, Memperbaki sistem android yang gagal Rom kebentuk semula atau ke bentuk system normal, Gangguan memang sulit di pecahkan dikarenakan kerusakan sebuah sistem operasi smartphone Android yang terjadi bukan factor di sengaja melainkan kendala dan kerusakan firmware bawaan system. Adapun gejala yang terjadi seperti ponsel gagal booting, mati total atau ponsel bootloop, padam, hardbrick, sering reset pabrik, masuk virus dan gangguan sistem software lainya. Berikut ini bahan dan tutorial cara flash yang saya post semoga dapat bermanfaat.
Berikut Bahan � Bahan nya.
- [Download] Firmware Panasonic Eluga Power
- [Download] FLASHTOOL
- [Download] Driver MTK USB
- [Download] Driver MTK Vcom
- [Download] MT65xx USB DRIVER
Notes : Sebelum anda Flashing di lakukan maka anda perlu menyiapkan bahan Flashing sepeti PC/Komputer, Kabel USB 2.0 atau 3.0, Windown XP,7,8,10 pada PC, Baterai ponsel anda minimal 50% saja sudah cukup.
Tutorial Flashing Firmware Ponsel Panasonic Eluga Power :
1. Download dan Install android drivernya.
2. Download stock rom firmware LG sesuai tipe Ponsel.
3. Download dan extrack bahan yang dibutuhkan yang diatas.
4. Setelah Terbuka FLASHTOOL di dalam folder flashtool.
5. Klik pada �Scatter-Loading� dan pilih � MT65XX_Android_Scatter.txt� di dalam folder.
6. Klik�Download/Firmware upgrade�.
7. Jika keluar tulisan seperti ini �Download Warning�abaikan saja lalu klik �Yes�.
8. Sambungkan Ponsel anda ke komputer/PC Dalam keadaan mati sambil menekan Tombol Volume Down/Volume UP.
9. Tunggu perangkat komputer mengenali smartphone anda.
10. Jika Keluar tulisan �PMT changed for the ROM,it must be download� berati anda harus menformat dulu ponsel anda terlebih dahulu di menu format padda flashtool. Pilih �Auto Format Flash dan Format whole Flash except Bootloader� lalu Klik/OK.
11. Tunggu hingga selesai 100% dengan di tandai lingkaran hijau.
12. Cabut USB.
13. Selesai
Demikian Tutorial dari RUMOH PONSEL Semoga dapat bermanfaat untuk semua orang yang gagal sistem android di ponselnya. Beri komentar yang baik dan sopan agar Admin menanggapi komentar anda.
download file now
How to Root Samsung Galaxy GRAND PRIME
How to Root Samsung Galaxy GRAND PRIME

This does however trigger the Knox Counter which means you lose your warranty...
Step 1: If you dont have, download Samsung USB Drivers on your pc.
Step 2:If you dont have, download odin for pc.
Step 3:Download Root Files.
Step 4:Open and un-zip Odin File
Step 5:Un-zip Root files
Step 6:Open the odin and click AP button and select root file...
Step 7:And click start for installition
Step 8:When installition finish your device boot on recovers automaticly and do every think automatic....
Step 9:Your device can boot up 2-3 times
Step 10:When your device booted , superuser is there..Good uses....
I see this post now but you posted it too before but its answered
See you later....

download file now
Wednesday, September 27, 2017
Firmware Replika Samsung Note 5 SM N9208 MT6572
Firmware Replika Samsung Note 5 SM N9208 MT6572

 |
| Replika Samsung Note 5 SM-N9208 MT6572 |
NOTE :
- Backup/Read terlebih dahulu untuk melihat versi software-nya
- Hubungi facebook admin untuk konfirmasi password file
- Laporkan jika link diatas rusak/mati
- Wajib tinggalkan komentar dibawah pos
- Terima kasih
download file now
Firmware Samsung J5 SM J5008 MT6572 MT6589 5 1
Firmware Samsung J5 SM J5008 MT6572 MT6589 5 1

|
| Samsung J5_SM-J5008_MT6572_5.1 |
NOTE :
- Laporkan admin jika link diatas rusak/mati
- Konfirmasi password silahkan hubungi +6285759107935
download file now
Installing TWRP Root unlock Samsung Galaxy A5 6 SM A510F 2016 6 0 1
Installing TWRP Root unlock Samsung Galaxy A5 6 SM A510F 2016 6 0 1
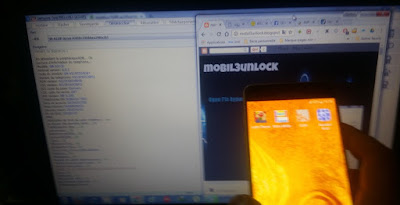
Preparation:
- Make sure your phone battery is charged to 70% or more
- Make sure you install the Samsung Drives on your PC, if you haven�t already.
- Backup your device data
- Download twrp_3.0.0-0_sm-a510 for 6.0.1 and SuperUser
- Download and Unzip Odin3 (3.10.7)
- Unlock new method by Z3X
How To Installing TWRP and Root Samsung Galaxy A5 SM-A510F (2016)
- First you should enabled Developer options
If Developers Option is hidden, go to Settings > About Phone > Built Number (tap on it for 5-8 times) - Enabled USB Debugging and OEM unlock
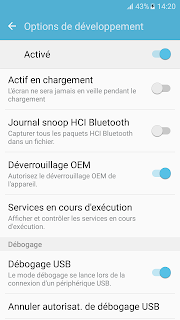
- Connect it to you PC using the USB cable and copy the SuperSU.zip file into the root directory of your internal storage.
- Turn off your Samsung Galaxy
- Boot the device into Download Mode as follows: press and hold Volume Down, Home and Power buttons together
- When a warning triangle appears on screen, press Volume Up button to enter Download Mode.
- Launch Odin3.exe by click right and run as administrator on computer
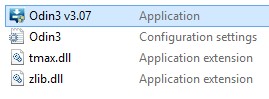
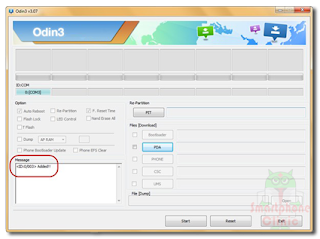
In Odin, tap AP button and find the TWRP Recovery file you downloaded earlier and select it
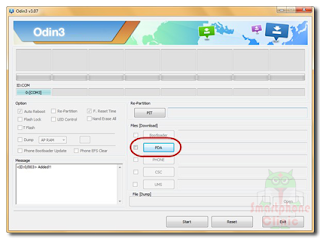
- Ensure Uncheck Auto-reboot in Odin
- click Start in Odin.
- Once the root installation is done, your phone will reboot and soon a PASS message with a green background appears in the left-most box at the very top of Odin
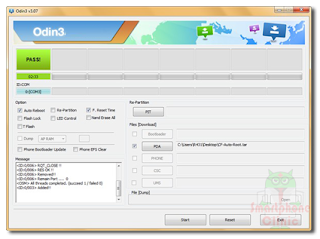
- Turn off your Samsung Galaxy
- Boot into �recovery mode�, by pressing and hold Volume Up + Home +Power buttons simultaneously
- Select �Install� and scroll all the way to the bottom till you see the SuperSU.zip file.
- Select the .zip file and swipe the bar to confirm. This will start flashing the .zip file.
- Once the flashing finished you will see the �Reboot System� option, click it to reboot your device.
- After reboot, Open menu. If the SuperSU App exist on your Application Menu on your smartphone it means you�ve succesfully rooted your device.
-

- Now Unlock Your Phone using Z3X
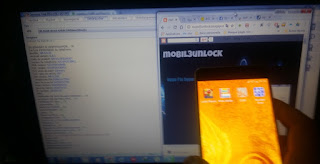
download file now
Firmware Samsung Galaxy Replika S4 GT I9500 MT6572 Read Scatter Miracle
Firmware Samsung Galaxy Replika S4 GT I9500 MT6572 Read Scatter Miracle


Download file-nya dibawah ini :
 |
| Samsung S4 GT-I9500 MT6572 100% Read Scatter File |
NOTE :
- Laporkan admin jika link diatas mati/rusak
- Konfirmasi password silahkan hub. +6285759107935
- Tolong tinggalkan komentar seperlu-nya saja
download file now
Tuesday, September 26, 2017
Daftar Samsung Galaxy Yang Mendapat Update Android Nougat
Daftar Samsung Galaxy Yang Mendapat Update Android Nougat
RUMOHPONSEL.COM - Cara Flashing Panasonic T41 Via Flashtool, Memperbaki sistem android yang gagal Rom kebentuk semula atau ke bentuk system normal, Gangguan memang sulit di pecahkan dikarenakan kerusakan sebuah sistem operasi smartphone Android yang terjadi bukan factor di sengaja melainkan kendala dan kerusakan firmware bawaan system. Adapun gejala yang terjadi seperti ponsel gagal booting, mati total atau ponsel bootloop, padam, hardbrick, sering reset pabrik, masuk virus dan gangguan sistem software lainya. Berikut ini bahan dan tutorial cara flash yang saya post semoga dapat bermanfaat.

Berikut Bahan � Bahan nya.
- [Download] Firmware Panasonic T41
- [Download] Driver USB MTK
- [Download] Driver USB MT65xx
- [Download] Driver VCOM
- [Download] SP Flashtool
Notes : Sebelum anda Flashing di lakukan maka anda perlu menyiapkan bahan Flashing sepeti PC/Komputer, Kabel USB 2.0 atau 3.0, Windown XP,7,8,10 pada PC, Baterai ponsel anda minimal 50% saja sudah cukup.
Tutorial Flashing Firmware Ponsel Panasonic T41 :
1. Download dan Install android drivernya.
2. Download stock rom firmware LG sesuai tipe Ponsel.
3. Download dan extrack bahan yang dibutuhkan yang diatas.
4. Setelah Terbuka FLASHTOOL di dalam folder flashtool.
5. Klik pada �Scatter-Loading� dan pilih � MT65XX_Android_Scatter.txt� di dalam folder.
6. Klik�Download/Firmware upgrade�.
7. Jika keluar tulisan seperti ini �Download Warning�abaikan saja lalu klik �Yes�.
8. Sambungkan Ponsel anda ke komputer/PC Dalam keadaan mati sambil menekan Tombol Volume Down/Volume UP.
9. Tunggu perangkat komputer mengenali smartphone anda.
10. Jika Keluar tulisan �PMT changed for the ROM,it must be download� berati anda harus menformat dulu ponsel anda terlebih dahulu di menu format padda flashtool. Pilih �Auto Format Flash dan Format whole Flash except Bootloader� lalu Klik/OK.
11. Tunggu hingga selesai 100% dengan di tandai lingkaran hijau.
12. Cabut USB.
13. Selesai
Demikian Tutorial dari RUMOH PONSEL Semoga dapat bermanfaat untuk semua orang yang gagal sistem android di ponselnya. Beri komentar yang baik dan sopan agar Admin menanggapi komentar anda.
download file now
Download Official Samsung Galaxy S5 SM G900F Android 6 0 1 Marshmallow Firmware
Download Official Samsung Galaxy S5 SM G900F Android 6 0 1 Marshmallow Firmware

download file now
DOWNLOAD FIRMWARE SAMSUNG KOREA SHW M110S
DOWNLOAD FIRMWARE SAMSUNG KOREA SHW M110S

Assalamualaikum...Wr....Wb.....
Semoga rahmat jua mardzotillah selalu menyertai kita semua......Amiiiin....
Alhamdulillah pada waktu ini kita bisa sua lagi di site ini berkat doa semuanya.
Apa dikhabar semuanya For now saya ini?
Semoga pada sehat wal afiat, andaikan aja ada yang sakit ane doain semoga lekas sembuh seperti biasanya.
BTW di ini waktu ane mau share Firmware SAMSUNG KOREA SHW-M110S
Cuma nitip sebelum ke aksi flashnya mesti hati-hati kali az ada yang salah
atau lupa ada yang ketinggalan alat tempurnya.
Sebelum proses flashing lebih good kalo di backup dulu firmware atau data pentingnya biar lebih nyaman gan.
Lebih baik lambat tapi hati-hati daripada cepet tapi ancur...he...he...he....
Semoga kita semua sukses slalu jua ada dalam lindungan Allah SWT slamanya...Amin...!!!
Silahkan ambil di vikas@COM
download file now
Monday, September 25, 2017
Flash Samsung Galaxy J2 via Odin3 v3 10 7
Flash Samsung Galaxy J2 via Odin3 v3 10 7

Micromax has officially launched the Funbook Pro that went on sale last month. It has 10.1-inch (1024 x 600 pixels) display and is powered by 1.2 GHz Cortex A8 processor. It has 0.3MP VGA front-facing camera and 3G support via Tata Docomo Photon+ Dongle. In addition to their previous partners Everonn, Pearson and Vinti, they have now partnered with McGraw Hill for interactive study materials for students from class 1 to 12 that is available for purchase on micro SD cards separately.
Micromax Funbook Pro specifications
- 10.1-inch (1024 x 600 pixels) capacitive touch screen display
- Android 4.0.3 (Ice Cream Sandwich) OS
- 1.2 GHz Cortex A8 processor with Dual Mali 2D/3D Graphics processor.
- 0.3MP VGA front-facing camera
- 1GB RAM, 8GB internal memory that is expandable up to 32GB with micro SD
- HD video playback (MPEG2/4, AVI, WMV, MOV)
- 3G (via USB Dongle), WiFi b/g, USB 2.0, HDMI out
- 5600 mAh battery that offers up to 5h browsing time
The Micromax Funbook Pro comes in Slate Grey color and is available from nCarry for Rs. 9999. It would be available from retail stores across India at the end of this month.
download file now
Sunday, September 24, 2017
Samsung Galaxy S8 Usung Fitur Misterius Bernama Beast Mode
Samsung Galaxy S8 Usung Fitur Misterius Bernama Beast Mode
RUMOHPONSEL.COM - Cara Flashing Panasonic Eluga S Via Flashtool, Memperbaki sistem android yang gagal Rom kebentuk semula atau ke bentuk system normal, Gangguan memang sulit di pecahkan dikarenakan kerusakan sebuah sistem operasi smartphone Android yang terjadi bukan factor di sengaja melainkan kendala dan kerusakan firmware bawaan system. Adapun gejala yang terjadi seperti ponsel gagal booting, mati total atau ponsel bootloop, padam, hardbrick, sering reset pabrik, masuk virus dan gangguan sistem software lainya. Berikut ini bahan dan tutorial cara flash yang saya post semoga dapat bermanfaat.

Berikut Bahan � Bahan nya.
- [Download] Firmware Panasonic Eluga S
- [Download] Driver USB MTK
- [Download] Driver USB MT65xx
- [Download] Driver VCOM
- [Download] SP Flashtool
Notes : Sebelum anda Flashing di lakukan maka anda perlu menyiapkan bahan Flashing sepeti PC/Komputer, Kabel USB 2.0 atau 3.0, Windown XP,7,8,10 pada PC, Baterai ponsel anda minimal 50% saja sudah cukup.
Tutorial Flashing Firmware Ponsel Panasonic Eluga S :
1. Download dan Install android drivernya.
2. Download stock rom firmware LG sesuai tipe Ponsel.
3. Download dan extrack bahan yang dibutuhkan yang diatas.
4. Setelah Terbuka FLASHTOOL di dalam folder flashtool.
5. Klik pada �Scatter-Loading� dan pilih � MT65XX_Android_Scatter.txt� di dalam folder.
6. Klik�Download/Firmware upgrade�.
7. Jika keluar tulisan seperti ini �Download Warning�abaikan saja lalu klik �Yes�.
8. Sambungkan Ponsel anda ke komputer/PC Dalam keadaan mati sambil menekan Tombol Volume Down/Volume UP.
9. Tunggu perangkat komputer mengenali smartphone anda.
10. Jika Keluar tulisan �PMT changed for the ROM,it must be download� berati anda harus menformat dulu ponsel anda terlebih dahulu di menu format padda flashtool. Pilih �Auto Format Flash dan Format whole Flash except Bootloader� lalu Klik/OK.
11. Tunggu hingga selesai 100% dengan di tandai lingkaran hijau.
12. Cabut USB.
13. Selesai
Demikian Tutorial dari RUMOH PONSEL Semoga dapat bermanfaat untuk semua orang yang gagal sistem android di ponselnya. Beri komentar yang baik dan sopan agar Admin menanggapi komentar anda.
download file now
Subscribe to:
Posts (Atom)